Showing posts with label Chocolate Baroque. Show all posts

Monday, 26 May 2014

HANG IT ! All for a mini-challenge

Hi everyone!  I'm pleased to be hosting the mini-challenge at Anything but A card this week and am so looking forward to seeing what the end results will be. To enter this challenge, pop on over to:
http://anythingbutacard.blogspot.ca/

I chose the theme "Hang It", firstly so that crafters / artists with many varied interests could perhaps be tempted to join in. I'm visualising anything that can be hung; including from people (jewellery, scarves, hair adornments, ...), walls, ceilings, windows, posts, mailboxes, trees, gates...  (the list could go on and on and on......)  and out of any medium.
As a retired teacher, space was often an issue in the classroom, especially when wanting to display work. One of the easiest and in the end, artistic, ways was to hang it, either on wires stretching across the room or as mobiles.
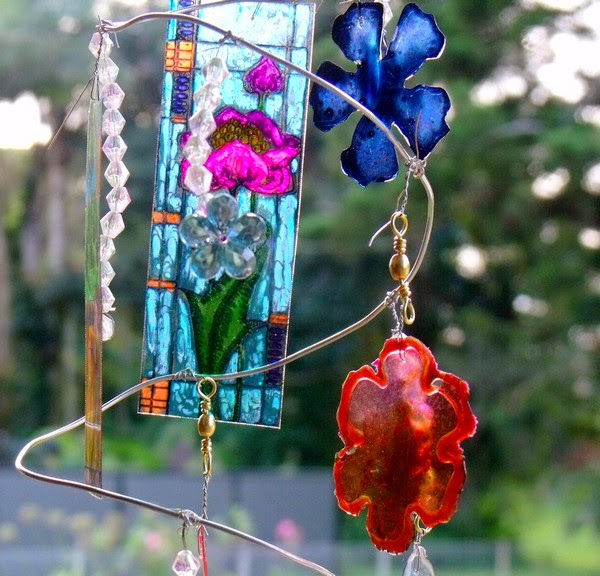
For the inspiration piece I have made a sun catcher/mobile. This is going to be photo heavy, so please bear with me, but it was the best way to show you what various elements looked like.


Photo taken when hung on the verandah


close-ups  of  sections of sun catcher taken indoors

The materials used were: a piece of stainless steel wire, wrapped around a bottle to create a spiral and acetate from packaging. This was treated using two different methods. Flowers were diecut and coloured with alcohol inks. This was applied directly to the acetate and then daubed.  Some were edged with glass effects gel medium. The remainder of the designs on the sun catcher were stamped on the acetate with Stazon black ink. The reverse was coloured using Tria pens and Peel-off pens. Both of these have a permanent ink base and a lovely brush tip.


die cut flowers photographed on white card

Chocolate Baroque Mackintosh Windows and Macintosh Beauty Sets. Black thread was replaced with fine wire.


To add some more sparkle to catch the sun I threaded lengths of crystal beads onto jewellery wire and added them, together with some 'jewelled' braid. The other item used came from my son's fishing supplies... swivels used for his lines. These allow the various bits and pieces on the sun catcher to move as they catch any breezes. On a sunny day, the glints of light bouncing around the room are really beautiful!
I do hope you feel tempted to join in the challenge so I can visit your blogs and leave a comment.
I know I truly appreciate comments left on my posts.
Catch up with you again soon.
Cheers, Di


Sunday, 16 March 2014

BIRDS OF A FEATHER?!!!!

Hi and welcome. The inspiration for this month's challenge at ARTastic is to include texture.... a great source of inspiration for me, particularly lately, as I have been exploring and playing with  inky, painty and gooey things and what happens when they are used together!


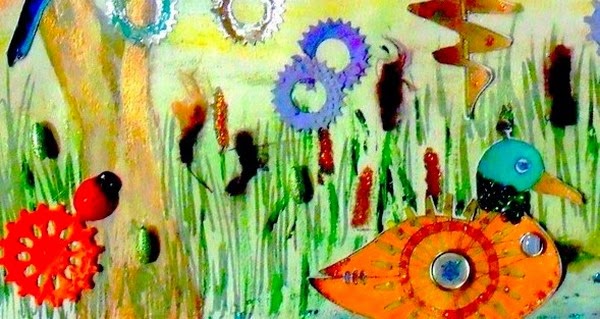
My piece for this ended up as a painted scene on a heavy watercolour A3 paper. Acrylics and texture paint were used to create the background scene and some of the features (tree and dove cote). 3D stamping paint was added in other areas (pond, parts of birds, and cogs). The birds were stamped with my new Chocolate Baroque Steampunk set...lovin' this!


                                          Close up of owl and doves!!! and dove cote


                                             Close up of parrots showing beading and cogs


                                                    Duck and bulrushes, cog flowers.
                                
They were coloured using metallic gel pens,  Lumiarte acrylic pigments and Silks acrylic glazes. To give more texture to the wings, I glued on micro- beads.
Cogs were made from aluminium flashing, embossed and painted with Vintaj patinas. Wool ans single beads were used for the bulrushes.


A bit quirky, but a lot of fun in the making.
There's still time to join in our challenge at ARTastic. Pop on over to:http://artasticchallengeblog.blogspot.com.au/  to see what our inspiration picture was and the fabulous artworks by the rest of the team. We'd love to see your art here.

Thank you for stopping by. Catch you again soon.
Cheers, Di.

Saturday, 1 March 2014

TWISTED LIGHT

Hi and welcome. Think of rainbows and misty rain and you'll have the perfect inspiration at Pixels and Paper this month. Interpret this photo as you wish and come and join us.


Pop on over to: http://pixelsandpaperchallengeblog.blogspot.com.au/  to see what the rest of the team has done for this month's challenge.
My take on this photo was to take the colours of the rainbow as a background for my layout. This was done with a piece previously gessoed and spritzed with dylusion ink sprays (a second generation print).


 To make a more uniformly covered background I swiped it with distress stains and then oversprayed with white dylusion ink to soften the colours more and to help them blend onto each other.
 

Images were stamped onto tissue paper and attached to the background with collage pauge.


A mauve vellum overlay was added to give the whole piece a misty, soft, luminescent appearance.
This w also stamped and streaked with Kindyglitz (falling raindrops).
.
 
Close up of 'rain' streaks
 
 
Close up of stamping and die-cut leaves
 
The photo was taken along the Huon River in Tasmania, just after a passing shower. We intentionally made sure that the sun's glow was a feature, but it was a surprise to see the effect of the twisted light when the photos were viewed later and then developed..... cool effect!


Thank you for visiting and leaving your lovely comments. Come and play with us at Pixels and Paper. We'd love to see your art.
Have a great weekend.
Cheers, Di.


Saturday, 1 February 2014

SEA SECRETS

Hi! Another month for some playtime at Pixels and Paper. This month our inspiration comes from this fabulous poster.


How will you use this to play? Maybe you will use the colours, the joy of dance, movement....
For my take on this I looked at the suggested movement and used some of the colours to make a layout.
I started with a dotted paper from Bo Bunny, gessoed through a stencil and while still damp, sprayed it with Perfect Pearls Mists.


Under the sea you can find many strange and wondrous creatures, including the gorgeous Spanish Lady Nudibranch, one of the sea slug family. This is what the image suggested to me the moment I saw it. The photograph used has come from a public domain site.


To go with this theme, I added stamped marine creatures and chipboard pieces. These were finished off with liquid pearls and Lumiere acrylic paints. Braid, webbing, net and flat bead 'bubbles' were added.


Come and play with us. Pop over to http://pixelsandpaperchallengeblog.blogspot.com.au/ to see what the rest of our team has done for this.
Hoping to see your art work here this month.
Cheers, Di

Tuesday, 3 December 2013

IT'S BEGINNING TO LOOK A LOT LIKE CHRISTMAS.....

...... on ev'ry site you see!!!!

Including Pixels and Paper for this month's challenge.
This month we have a vintage Christmas photo for your inspiration, so we would love to see your project based on an aspect of Christmas shown here. You have until midnight, 5th January to submit your creation, so we hope that this gives you plenty of  time to enjoy the festive season with family and friends and hopefully finding  some crafty time for yourself.


Pop over to:http://pixelsandpaperchallengeblog.blogspot.com.au/ to see what the team has produced for this.
This is my DT piece for the challenge. I focused on the stockings and used this concept as a centrepiece for my layout. This was done with iris folding.


On the background I've also stamped a Christmas ornament topper  (Chocolate Baroque stamps) with versamark, then heat embossed it  and added braid so that it looked like they were hanging.
The inspiration photo also reminded me of my childhood when many of the decorations for the house and the tree were handmade. I remember making strings of bells from milk bottle caps, washed, turned inside out and moulded into bell shapes over a lemon juicer. We also made paper chains from cut up cards and crepe paper.
For this memory, I chose to make the ornaments from stamped foil paper, (Chocolate Baroque stamps)  and again heat embossed the design. This gave them the look of some of the gorgeous decorations that were always packed away carefully each year. The idea of stamping and cutting out the ornaments was the result of a play day at Julie's at: http://timetocreate-handmadetreasure.blogspot.com.au/


Some close-ups of the ornaments. Sorry about the blueness of the background. In trying to get the detail of the ornaments to stand out more, the background was brightened a wee bit too much. The photo below is more of the real colour. Sentiments are Words from Darkroom Door.
 

The photo of our son taken in 1990 was framed with foil paper, smooshed with 3D Stamping Paint. Journalling has been done on tags popped into the folds of the stocking.
 

On the base I've placed a strip of "Merry Christmas" words in  various languages  (Graphic 45). I played with some soft metallic silver Pan  Pastels and 3D Stamping Paint on this strip.

Thank you for visiting and please pop on over to Pixels and Paper to have a peep. We'd really love it  if you decided to have a play with us.

Cheers, Di

Tuesday, 19 November 2013

Golden Tag

Hi and welcome. We've certainly had an interesting week of storms, wind and hail in our region over the past week. At home this has not been to the extent of towns nearby where, in some centres it certainly looked like a Northern winter scape!
In my exploration of challenge sites I came across "Lets get Shabby Challenge" blog and decided to put an entry into their latest challenge ( just getting it in!), which is themed on "Gold". For this challenge at: http://letsgetshabby.blogspot.com.au/  I decided to make a tag. This was cut from a pearlised glittery cardstock which was coloured with gold metallic alcohol ink. Even though this card only had a soft satin sheen to it, the alcohol ink took well without any bleeding on the underside.
On the background I've stamped a steam punk rose image from Chocolate Baroque's steampunk butterfly set. This was coloured using 3d Stamping Paint.


The flowers were quilled from different gold papers, including a soft metallic gold vellum.


Some layering with corrugated cardboard, Tim Holtz tissue paper, diecut cog and ribbons were also used.  Around the edges I've added a random border of mica flakes.


 Thank you for visiting. I really appreciate your encouraging comments.
Cheers, Di

Saturday, 19 October 2013

ENCHANTED GLADE (with Zentangles)

Hi and welcome. It seems like ages since my last post, but I am still having a bit of a nerve problem in my hand, so some activities are limited. However, I have had a couple of fabulous playdays/ classes with friend Julie at:http://timetocreate-handmadetreasure.blogspot.com.au/. It was great to get back together with friends to create some amazing pieces.
This layout is for the current challenge at ABAC, where the criteria is for orange or orange and  black.  Pop on over to http://anythingbutacard.blogspot.ca/    to see what the DT members have done for this.
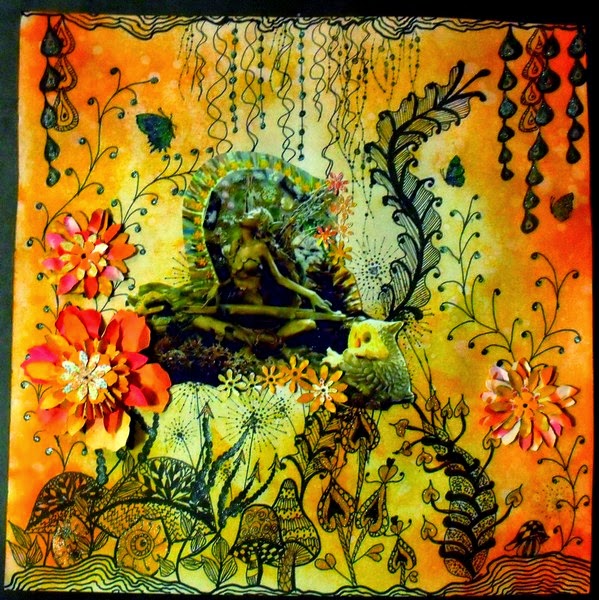
I've gone for a fantasy theme. The background was doodled first, creating the glade. Some newly purchased Chocolate Baroque stamps (lovin' these!) were used for some extra detail.


The whole background was then smooshed with Distress Inks (Wild Honey, Dried Marigold, Spiced Marmalade and Ripe Persimmon). After attaching the photo and adding die cut flowers (again from smooshed and inked paper) I highlighted some sections with 3D Stamping Paint (blue and copper) to give a bit of sheen.


            Some close-ups of the layout... trying to show the effect of added 3D paint, and stamping.

I have used the fairy composition in the photo before, in a different setting and colour. She is a favourite of mine and may appear again sometime in the future, with some changes. I rather enjoy making different scenarios for her.
Thank you for visiting. It's always a pleasure to read comments that are left.
Cheers, Di