Showing posts with label Dylusion Ink Sprays. Show all posts

Wednesday, 15 July 2015

GRAB THE BROLLIES!!!

Hi and welcome. As I'm writing this post, the temperature outside has dropped and I know we're in for another chilly night.... just right for snuggling up in a warm doona!
Our inspiration at ARTastic this  month was based on the artwork of Shirley Charlton (aka Shirlroma) called "Umbrellas, wet street". 
I loved this piece, with its wet, reflective appearance, the pops of colour from clothing and umbrellas and the texture on the pavement. 


I had a photo taken on our last holiday in Tasmania, showing the reflective view of yachts and old buildings on the waterfront area of Hobart, and the rain falling on the nearby Mt Wellington. This, was just right for our theme and added criteria this month. Minutes after taking this photo we had to make a dash for cover... no brollies on our holiday!


The background was stencilled onto white card, using a new stencil which I thought went so well with a flagstone look.

 
This was left to dry slightly before spraying with various ink sprays and building up layers of colour using Glimmer Mists and Lindy Stamp Gang Sprays. These gave a beautiful metallic , watery sheen to the whole of the background. Once these were dry I sprayed sections with Dylusions Ink Spays and let them dribble freely down the page... helped by misting with water.


Umbrellas were made from papers which had also been sprayed or inked in some way. This one I stamped with versamark and heat embossed using a white embossing powder. It was then overstamped and coloured with Inca Gold 'Rose Quartz'.


Two of the brollies were cut from smooshed Distress Inks, using some of this year's colour releases. two were cut from paper sprayed with Dylusions Ink Sprays, and the remaining one on the centre of the grouping was cut from tissue paper which had been painted with Dylusions Acrylic paints (the most yummy colours!)
 

The title was also cut from the same types of paper and then given a coat of Glossy Accents to give them a wet look. This was also applied to the ribs of the umbrellas.
A lot of messy fun, using techniques and mediums I love to play with.
If you want to play with us, pop on over to:artastic and check out what the team has done. We'd love to see your art here.
Cheers, for now.
Di


Wednesday, 3 June 2015

SOAR

Hi and welcome. This month at Pixels and Paper our photo to inspire you features hot air balloons and quite an iconic Aussie structure... the windmill seen so often on farms and outback stations.


I've taken the idea of the balloons and the windmill and have created a layout without photos.


The balloons feature some of the colours from the inspiration photo and have been made in three different ways:- Iris Folding, Venetian Folding and the one in the centre at the bottom of the page, by gluing strips of paper to a balloon template. The lower edge of the paper has then been stamped  with trees and of course, a windmill. This stamping was also on top of the balloon to make it look as if it was rising behind the treeline.
The title "Soar" was cut from card which had been gessoed through a stencil then sprayed with Dylusions Ink while wet.

Pop on over to:pixelsandpaper and check out what the rest of the team has done. We'd also love to see your artwork here.
Catch you again soon.
Cheers. Di

Thursday, 15 January 2015

DORRIGO: DT Piece for ARTastic

Hi and welcome. I hope your new year has been everything you'd hoped for so far. ARTastic has a fabulous challenge this month, using as their inspiration, some street art by Fintan Magee. Fintan is an Australian street artist known for his murals throughout Queensland and later, in New South Wales.


I've taken the bricks from the mural as my inspiration for my layout.
The background has had double layers of stencilling. The first layer was a light coat of gesso was done over a smooshed  and sprayed background. Then I used a brick / stone wall stencil with Modellier Creme (Chocolat)


To this, I also added torn pieces of washi and Tim Holtz paper tapes and various stamps in black archival ink. Under the photo (which is of a mosaic tile mural on the wall of a building in Dorrigo, NSW), I have used torn cardboard from packaging. This was embossed and then smooshed with distress inks. The journalling was done on crumpled glassine paper. A white Sharpie paint pen was used for the writing.


There is still time to join us at  artastic this month, so why not pop on over to the blog and have a look at what the rest of the team has done with the inspiration image. We'd love to see your art.
Cheers for now.
Di

Thursday, 1 January 2015

NERIDA WELCOMES IN THE NEW YEAR

Hi and Happy New Year everyone. I hope 2015 brings you much joy, good health, love, peace and the chance to indulge in your favourite pastimes.
The full impact of summer has hit us in the southern regions of our planet and in light of this, Pixels and Paper Challenges have for your inspiration a theme that will sure to have you searching for the summer fun moments.

My take on this can only be described as different, as it brought out the inner child and my love of fantasy.

Let me introduce you to Nerida in her wondrous under-the-sea grotto. With her you'll also see some of her close friends.


I've used a large canvas board on which to create this artwork. The surface was coated with gesso before spraying with various inks including; Lindy Stamp Gang, Perfect Pearls Mists and Dylusions Sprays. I use combinations of blues, aquas, greens, yellows, and silver before a final quick burst with Perfect Pearls "Perfect Pearls".


Once dried, the background was stencilled with Viva Decors Modelling Cream, again using sea-toned colours. The Mother of Pearl was the perfect one to use for the bubbles,


Nerida, a mermaid from a Chocolate Baroque set, was stamped, photographed and then copied onto A4 laser print paper, to give me the size I required. She was coloured using a water brush and the same set of modelling cream colours. I also used these for colouring the other stamped pieces (small seahorse and seaweed).
The dolphin is a photo of part of a large door feature I did while teaching. Again, the photo of this piece was printed onto laser paper and the dolphin cut out.
Chipboard sea shapes were inked with chalk edgers before decorating with Viva Decor Pens.
Strings of beads were added to make some interesting underwater plants.


Larger beads were added to the top of the grotto. These were placed to look as though they were swaying in gentle ocean currents.


I hope you enjoyed meeting Nerida and her friends.
I really had fun doing this canvas and I am loving the effects that can be done with a combination of sprays, modelling creams and stencils.
Pop on over to:pixelsandpaperchallengeblog to see what the rest of the team have done with our inspiration photo.


Thank you for stopping by. Cheers, for now. Di

Monday, 24 November 2014

FIVE FINISHES FOR NOVEMBER FIVE SUNDAYS AT ABAC

Hi and welcome. This month again has five Sundays, and in keeping with this, Anything But  A Card Challenges is once more featuring the Number Five.


 I have made a small hanging using five different, simple and quite fast techniques to change paper / card into very different looking backgrounds.


The large 5 has been gessoed and sprayed with Dylusions Ink Sprays while the gesso was still wet. When dry I resprayed some sections. This gave an interesting effect with a combination of some white, and different hues of blue.

The smaller 5 has been stamped using a self- made stamp. For this I used scraps left over from mounting stamps onto backing.  These give great effects and you can change them to produce whatever patterns/designs you want whenever you want.


This 5 has again been stamped with a self-made stamp. I took a small block of wood and glued twine / wool on it in a design. They won't last forever, but it's surprising how much stamping you can do with just one application of ink or acrylic paint. If you like you don't have to glue the twine down. You can simply wrap it for an interesting effect.


The smaller 5 has been sprayed with various mists through a stencil The sprays were then fixed with a craft fixative spray.
The larger 5 has been done using a very interesting technique used at timetocreate, on one of our explore days. This simply involves using glossy photos (these can be the oops ones), Viva Modellier Creme ( a luscious, pearly / metallic modelling paste) and some alcohol inks. For this number I cut the photo into segments and glued them onto a backing piece before stencilling with the modelling paste. When dry I pounced over thew whole number with alcohol inks.

All of these techniques are designed to change paper to provide backgrounds for other projects. By using them you produce a piece that is totally unique and individual.
Pop on over to:anythingbutacard to have a look at what others in the team have created. We'd love to see what you come up with.

Thanks for dropping by. Catch you again soon.
Cheers, Di

Sunday, 31 August 2014

FIVE FACES OF ME?

Hi and welcome. Over at Anything But A Card we have a week long challenge, based on the Number 5... five of anything. Pop on over to: http://anythingbutacard.blogspot.ca/ to check out the challenge and what the rest of the team has done to inspire you.

For this, I've made a tag. The base is  card which has been used initially as an overspray/ inking sheet. To this I added additional smooshings of distress inks and splattered with water.


This was then sprayed with Dylusions ink  and Glimmer Mist. Gesso was also applied through a stencil. As this was added while the sprays were still damp, some of the green was able to bleed into the gesso.


The card was cut to the size I needed. Photos of a juvenile tawny frogmouth were cut out. This particular tawny spent a crazy 30 - 40 minutes one morning,  gyrating and bobbling around on the branch while its two parents, appeared to look on in askance at its behaviour. We were able to capture various moments in this episode between fits of laughter. The juvy just carried on unperturbed. The photos chosen show just  five of the poses and facial expressions we captured... there were many more.  Some of the positions it put itself into made it look like a gargoyle, so this became its name. 


Added to the tag was stamping,  torn net fibre and scrim.

Thanks for stopping by and leaving comments. I always like to see what people think and I like to reciprocate by visiting your blogs and leaving comments as well.
Catch you again soon.
Cheers, Di

PS. ABAC is currently having a Design Team call. If you are interested in becoming a member of our team, check out the details.

Wednesday, 16 April 2014

WASHING BASKET ROCK AND ROLL!!!

Hi and welcome.
ARTastic has been running a fun-filled challenge this month, celebrating those memorable, candid and sometimes silly moments.
 Pop on over to the site at:http://artasticchallengeblog.blogspot.com.au/  to see the art inspiration and what the rest of the DT has been up to... you're in for a treat!
Usually when the silly, spontaneous moments happen, a camera isn't in sight, but sometimes you strike it lucky, as I did when I took these photos of my son.


These were taken when he was about 13 months old and confidently walking/running. One of his favourite activities was to climb into my washing basket and rock himself around the yard. There were often the WHOOPS!!! moments, but he always came up laughing and very pleased with himself.
The background started life out as a wipe-off sheet and underlay sheet for sprays. The result of this was a very bright and not totally covered piece of card stock. To tone the colours down and to complete the background under layer, I sprayed sections over with Dylusions Ink.. Chocolate, and smooshed in Distress Inks... brown tones, bundled sage and wild honey.


To create the texture of the basket, out came a favourite medium of mine at the moment.. gesso. The stencil used kind of gave this look, so gesso was applied to the base colours, while they were still slightly damp. I like the interesting effects this gives when the colours combine.


Some sections were still too bright so an additional layer was added on top of the gesso with Dylusions ink.. White linen... love this loo on paper! The stencil was placed roughly in a circular pattern to give the idea of motion.


To complete the layout I added a border of random stamping as well as sections around the photos. A Sn@p - Simple Stories piece and other bits and pieces were added..including a film strip design washi tape.
Thank you for visiting and for leaving your lovely comments. These are always truly appreciated.
You still have time to enter this fun challenge and to show off the silly moments in your life. Come on over.. we'd love to see your art  here.
Cheers, Di.

Saturday, 1 March 2014

TWISTED LIGHT

Hi and welcome. Think of rainbows and misty rain and you'll have the perfect inspiration at Pixels and Paper this month. Interpret this photo as you wish and come and join us.


Pop on over to: http://pixelsandpaperchallengeblog.blogspot.com.au/  to see what the rest of the team has done for this month's challenge.
My take on this photo was to take the colours of the rainbow as a background for my layout. This was done with a piece previously gessoed and spritzed with dylusion ink sprays (a second generation print).


 To make a more uniformly covered background I swiped it with distress stains and then oversprayed with white dylusion ink to soften the colours more and to help them blend onto each other.
 

Images were stamped onto tissue paper and attached to the background with collage pauge.


A mauve vellum overlay was added to give the whole piece a misty, soft, luminescent appearance.
This w also stamped and streaked with Kindyglitz (falling raindrops).
.
 
Close up of 'rain' streaks
 
 
Close up of stamping and die-cut leaves
 
The photo was taken along the Huon River in Tasmania, just after a passing shower. We intentionally made sure that the sun's glow was a feature, but it was a surprise to see the effect of the twisted light when the photos were viewed later and then developed..... cool effect!


Thank you for visiting and leaving your lovely comments. Come and play with us at Pixels and Paper. We'd love to see your art.
Have a great weekend.
Cheers, Di.


Saturday, 15 February 2014

Inkiness at ARTastic with the Three Sisters

Hi and welcome. It's been an inky month for the current challenge at ARTastic. We have a fantastic inspiration piece to get creativity flowing.

                                                                 Joshua Miels "Pretender"

I found this inspiration piece very striking and I loved the way the background was made up of free-form, flowing lines surrounding the image of the woman.
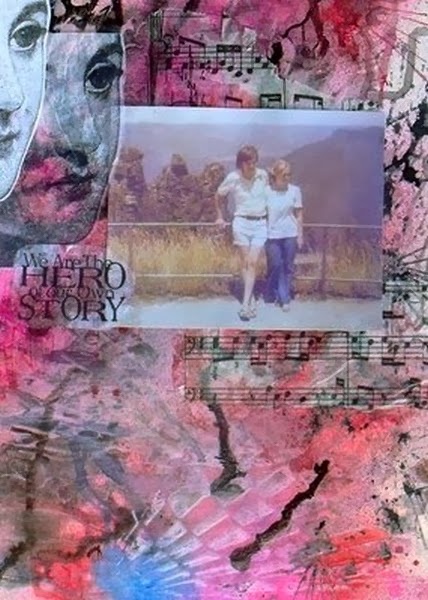
With my take on this, I decided to use a photo taken at Katoomba in the Blue Mountains, NSW.
I used heavy A3 watercolour paper for my background and used gesso to start building layers through a stencil. While it was wet it was spritzed with Dylusion Ink Sprays. These were quite vibrant and to tone them down IO re-gessoed through the stencil again, before adding black and red inks and manipulating the paper, as well as blowing on them, to allow them to run freely.


I also added some blue splashes to reflect some of the colours in the photo.
The faces and inspirational sentiment were stamped on tissue paper. The music tissue is a piece of Tim Holtz tissue wrap. For some reason, when I see mountains I always think of songs about mountains, particularly 'Climb Every Mountain' from the 'Sound of Music'.


I really love the way that tissue allows the underlayers to peep through.


On the back, I've added the Legend of the Three Sisters, There are a few different versions, but this is the one I like the best.

'In Australia, the mysterious Blue Mountains rise high above lush rainforests and deep valleys. In the area where lived the Gundungurra people there rises an outcrop topped by three rocky formations, known as The Three Sisters. This is the story of how they came to be there.
Long, long ago, the mystical land of Gondwana was beautiful, peaceful and untouched. In Gondwana there lived Tyawan, a Clever Man of the Gundungurra people. He had three daughters called Meenhi, Wimlah and Gunnedoo, whom he treasured above all else.
In a deep pool in a hole in the valley, there lived a Bunyip, a huge evil creature who loved to feast on human flesh, particularly that of young girls and women. Its cry was harsh and horrible and if you heard it, the only safe thing to do was run away as quickly as possible. Everyone feared the Bunyip.
If you needed to pass its hole, it was important to creep very quietly so that it was not disturbed. When Tyawan had to pass the hole, he would leave his daughters safely on the cliff above, behind a rocky wall- just in case!
One day when waving goodbye to his daughters, he descended the cliff steps down towards the path near the Bunyip's hole. While the girls were waiting and chatting on top of the cliff, a huge centipede suddenly appeared. Startled, Meenhi screamed, jumped up, picked up a stone and threw it at he centipede.
The Bunyip, angry at being awakened, roared and dragged himself through the split to see the terrified girls cowering in the ledge. His evil eye widened in delight at the feast before him.
Tyawan looked up and saw the Bunyip reaching for his daughters, so he pointed his magic bone at the girls and immediately turned them to stone so they would be safe there until the Bunyip had gone and then Tyawan would change them back to their former selves.
But the Bunyip, angered at being deprived of its prey, chased Tyawan through the forest and up the mountain where he found himself trapped. So Tyawan used his magic bone again and changed himself into a Lyre Bird and glided away. Everyone was safe. But then, in dismay, Tyawan realised he had dropped his bone whilst changing.
After the Bunyip had gone back to his deep, dark pool, Tyawan glided down to the forest floor and searched and searched for his magic bone.
There he can still be seen to this day in the shape of the Lyre Bird, scratching and searching the forest floors of the Blue Mountains, looking for his bone, calling to his daughters above and feeding on insects while he searches.
The Three Sisters stand silently watching him from their ledge, hoping and hoping that one day their father will find his magic bone and be able to turn them back to Aboriginal girls".

I hope you enjoyed reading this legend.

 Please drop by ARTastic at:  http://artasticchallengeblog.blogspot.com.au/  to see what the rest of the team has done with this month's challenge. We'd love you to come and play.

Thank you for visiting and for your encouraging comments.
Cheers, Di