Showing posts with label ABAC challenge. Show all posts

Sunday, 18 January 2015

ART JOURNAL FOR 2015

Hi again. This month at Anything But A Card, we are looking at new beginnings. This can be interpreted in many ways and I have chosen to start a new art journal for the year, in the hope that I can be more organised with my experimentation and discoveries.


I started with a plain A$  2-ringed folder / binder. I covered this with an application of gesso then sprayed and spritzed with various sprays and inks through a stencil as well as freely.


When dry I decided to use a new stencil (large flower)  using Viva modellier creme to create the flowers. These were then either outlined with glass effect gel (black) or dotted with viva decor pens in copper or sparkle.


Black stamping was also used....another new stamp from Visible Image.
Added also, were quotes stamped onto tissue paper and then applied to the folder.

Pop on over to anythingbutacard and check out what the rest of the team has come up with for this month's inspiration.
Cheers, Di

Monday, 22 December 2014

CARNIVALE MASQUE

Hi and welcome.  It's such a busy time of the year so  thank you for dropping by. Anything  But A Card, this month, has been delving into the theme "Celestial", which has meant quite varying things to members of the team.
After a play day at  timetocreate  exploring different ways to change background papers, one paper in particular screamed.. Celestial!!!!  The whole piece, once finished, reminded me of some distant planetary system with moons, satellites, planets. I originally was going to do a mobile featuring such planetary objects, but after a very vivid dream, and one which oddly for me stayed in my mind the day after, I came up with the idea of a festival mask.

Completed mask with photo edited on a night setting to show the glitter.

The background was a glossy black A4 card.  This had been daubed with metallic acrylic paints in copper and bronze.  radiating from these were lines of Viva metallic pens. In between we stamped with silver  and added imprints from the end of our daubers with gold 3D Stamping Paint.


Close-up of mask how it looked at first

To the mask shape cut from this background I added some gold glittered stars, (these have come up silver on this photo), stars cut from gold and copper-coloured mirror board (finished with Kindyglitz bling) and tinsel pipe cleaners bent into star shapes . I added additional silver finishes around the outside of the frame and eye slits ( dabbed on silver ink).

Mask shown in natural light
 I thought that this would be the finish but after further contemplation decided to add another element.. a "Man in the Moon cut from pearlised white card and edged with Kindyglitz. Unfortunately the eye details and edging have not shown up on these photos. The mask is held by hand. This leg has been made from a thin piece of dowel, with tinsel pipe cleaners twisted around it.


mask with the addition of a moon.


Thank you for stopping by. There's still time to get your celestial muses working. We'd love to see your art at anythingbutacard so  why not drop on over and have a look at the amazing pieces done by the rest of the team.

Cheers for now.
Di


Monday, 17 November 2014

UPCYCLING FOR ANYTHING BUT A CARD

Hi and welcome.
Today I'm sharing a quick upcycled project, one that lends itself to many different interpretations and themes... napkin or serviette rings.


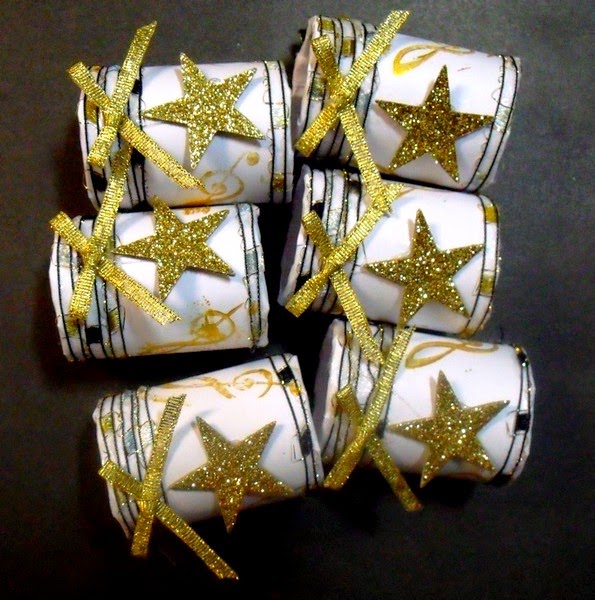
For this project I've used the inner roll from aluminium foil, cut into lengths. These were covered with stamped laser colour paper (a thin card). The ends were glued and wrapped with metallic yarn.  I added gold bows (shop bought) and small wooden stars coated with gold glitter flakes. A simple makeover, relatively fast to do... and it used up some bits and pieces I've had for some time.

There's still time to enter our challenge at Anything But A card this month... anything  goes as long as it isn't a card. We'd love to see what you could do for this. Pop on over to:anythingbutacard  and check out what the rest of the team has done, as well as the amazing entries that are already in.

Thanks for dropping by.
Catch you again soon.
Cheers, Di

Monday, 20 January 2014

IT'S ALL BALANCED!

Hi and welcome to my first post as a newbie on the Anything But A Card team.... and what a thrill it was to have been asked to join. The inspiration this month was taken from this beautiful photo,


with the added criteria of balance. Pop on over to the ABAC Challenge at:
http://anythingbutacard.blogspot.ca/  to see how this inspiration has taken the rest of the team.

I decided to take the artistic meaning of balance and designed a yin-yang zen-tangled inspired pattern.


I  find this style of doodling quite relaxing and it was a technique I used regularly in my former life as a teacher. The designs the children came up with were always amazing and they were always so engrossed when doing them (this = quiet! always a big plus in the classroom!!)
This design was drawn onto white cardstock. To make sure my pattern was the same both sides, I first outlined the white section and then photocopied the design. The rest of the colour was added to both sides of the design before I put them in place. Even though this looks fiddly, it wasn't really. The only thing I found to be a problem, was when I joined the two pieces together and discovered I still had a small gap! Easily fixed... just added another pattern element.  Once all of the drawing and shading was completed, the whole piece was adhered to a canvas which had been prepared by painting with white and black gesso. I used 2 - 3 coats of both to get a good coverage. Stick-on black beads were placed along the white / black border: gave some extra dimension as well as covering any small paint line errors. I used the same idea with the outside of the circle, using larger stick-on pearls. I didn't have any black ones in the size I wanted, so coloured the white ones with a permanent ink pen.
The flowers were cut from a lace paper I've had for years. The other component was chipboard flourishes, again painted with the 2 gessos.
All of the gluing was done with Collage Pauge and this was also used as a sealer over the whole of the canvas. I used a permanent Sharpie pen for the design.
Thank you for visiting. I always love to read your comments. Come over and play with us.
Cheers, Di

Saturday, 21 December 2013

FLIPPIN' OVER CHRISTMAS

Hi and welcome. You could take this title in a number of ways (depending on mood). However, I have made a tag, with a Christmas theme.
First, I used a Petaloo magnetic tag for the base. This is a deep chocolate brown which is great as a base colour to give additional depth. I'll apologise here for the quality of the photos.. really should have done them in natural light so that the true colours were more obvious (NOT !! at 1.00am!!)


This was painted liberally with Collage Pauge, and TH tissue paper was adhered to it.


After this I used a chevron stencil and white gesso to create a background. With the stencil in place I spritzed with glimmer mists  and then removed the stencil and left everything to dry.


When dry, Inca Gold (soft gold and apricot) were rubbed in.This gave the tag a beautiful pearly finish, while still allowing the chevron pattern and sprayed colours to still be seen.
Inside the tag I glued on paper strips,and fabric pieces, again with the Collage Pauge.These were tidied up before the edges were covered with paper tape, again smooched with Inca Gold.


A paper doily, smooched with a chocolate coloured Inca gold and a die-cut strip of paper was used to frame a vintage image. A Christmas poem torn from an old poetry book completed this section, together with a die-cut and embossed bauble (foil paper).


A dove was die cut and embossed from pearlised cardstock. Pan Pastels were applied to sections and the whole piece lightly spritzed with biscotti Perfect Pearls.When dry, some sections were highlighted further with Inca Gold. A piece of ribbon was threaded through the cardstock to form the basis of a very retro choker. Miss Bird was certainly getting into the Christmas spirit with her choice of jewels to adorn herself. A Christmas tag, again a deep chocolate brown,  salvaged from an old 
Kaiser craft range and some lace completed the front. Rayon ribbon was coloured using distress inks, and used to complete the tag.


Thank you for looking. I'm entering this piece into:
http://anythingbutacard.blogspot.ca/  where the team members were getting into the holiday spirit.

and  http://ourcreativecorner6.blogspot.com.au/ where the team was looking for a vintage Christmas, with no red  or green.This is a first visit to this blog challenge.

Have a happy and safe Christmas. Cheers, Di

Thursday, 21 November 2013

Autumn Tag

Hi and welcome. Tags are becoming one of my favourite forms of mini-art. I've a long way to go, but am enjoying the experimentation process.
This tag is for the current challenge at Anything But A Card: Fall into Fall.  Pop on over to: http://anythingbutacard.blogspot.ca/  to see what the DT has been up to.


I used a Kraft tag for the base and smooshed it with gold metallic alcohol ink, as well as the colours previously used and left on the applicator. I loved the effect this made and it's one I'll use again. I was surprised to see how well a non-glossy surface took alcohol ink. the edges were swiped with Inca gold.


For the next layer I added a smaller tag made from a  metallic gold vellum. The edges of this were swiped with 3D Stamping paint. The next tag was made from acetate packaging, alcohol inked and then put through an embossing folder. On the front I rubbed on some Inca gold and 3d stamping paint. The leaves were die cut using the Tim Holtz Tattered Leaves die. These were also cut from acetate packaging and glossy cardboard packaging. The surfaces were treated the same way as the base with the addition of metallic gold alcohol ink.


Some images from Graphic 45 "Place in Time" collection and a snippet of an autumn poem from  an old poetry book (smooshed with Distress Ink) completed the tag. It was finished with a bow made from seam binding, spritzed and sprayed with Dylusions Inks, Glimmer mists and water.


Thank you for visiting and for your lovely comments.
 Cheers, Di.

Saturday, 19 October 2013

ENCHANTED GLADE (with Zentangles)

Hi and welcome. It seems like ages since my last post, but I am still having a bit of a nerve problem in my hand, so some activities are limited. However, I have had a couple of fabulous playdays/ classes with friend Julie at:http://timetocreate-handmadetreasure.blogspot.com.au/. It was great to get back together with friends to create some amazing pieces.
This layout is for the current challenge at ABAC, where the criteria is for orange or orange and  black.  Pop on over to http://anythingbutacard.blogspot.ca/    to see what the DT members have done for this.
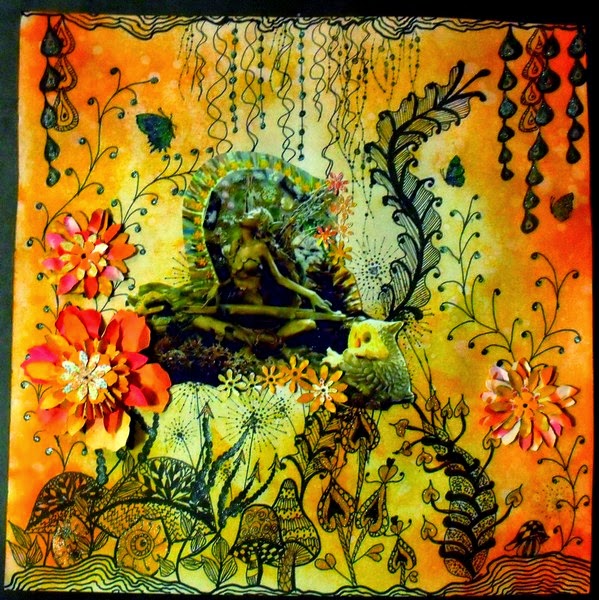
I've gone for a fantasy theme. The background was doodled first, creating the glade. Some newly purchased Chocolate Baroque stamps (lovin' these!) were used for some extra detail.


The whole background was then smooshed with Distress Inks (Wild Honey, Dried Marigold, Spiced Marmalade and Ripe Persimmon). After attaching the photo and adding die cut flowers (again from smooshed and inked paper) I highlighted some sections with 3D Stamping Paint (blue and copper) to give a bit of sheen.


            Some close-ups of the layout... trying to show the effect of added 3D paint, and stamping.

I have used the fairy composition in the photo before, in a different setting and colour. She is a favourite of mine and may appear again sometime in the future, with some changes. I rather enjoy making different scenarios for her.
Thank you for visiting. It's always a pleasure to read comments that are left.
Cheers, Di

Saturday, 28 September 2013

Bookmark

Hi and welcome. Sorry I have been so tardy in visiting your blogs, but I've had the flu and I've strained tendons in my right hand from some over-zealous gardening!...absolute nuisance as it has restricted what I'm able to do. Hopefully it is on the mend.
At http://anythingbutacard.blogspot.ca/ this month's challenge was about books. What I had planned for this didn't happen, instead I've decided to go with a bookmark, using vellum, page from an old poetry book, and cardstock.


The vellum design was drawn with a very fine sharpie pen and coloured using Lyra pens. The images were then dry embossed on the reverse side, to give them a raised look. The outline was pierced (just like pin-pricking) and torn to give a lace-look edging. A border was done in a silver permanent liner. An additional butterfly was done in the same manner from vellum, fussy cut and placed over the original one. This top butterfly was given a fairly dry brushing of  3D Stamping Paint to give a slight sheen. The vellum was mounted to the poetry page using brads. This was then roughly torn to the same shape as the vellum layer. Both layers were then placed on cardstock layers. Punched flowers were added around the edge. These were left-over cardstock from Distress Ink experiments. With these in position, the bookmark edge was fussy cut to follow the line of flowers.


Added butterflies were punched from left-over poetry and old manuscript music bits. A beaded edge was added. Because I decided to go with the 3-D look for this bookmark, a length of wide ribbon was added for the marking of the page inside a book, so that the rest of the bookmark resides on the cover.


The outer edge of the bookmark was also finished with the 3D stamping paint.
Thank you for looking and for continuing to leave positive comments. These are truly appreciated and I look forward to catching up with everyone as as soon as possible.
Cheers, Di.


Friday, 30 August 2013

Fairy Door Hanger


Hi and thanks for stopping by. This challenge piece for ABAC at http://anythingbutacard.blogspot.ca/  is about fairies. The photo of the fairy was taken of a gorgeous metal woodland fairy I bought a couple of years ago. her wings are made from loosely woven twigs, so of course she had to have  woodland setting.


The door hanger is a piece of plywood which was painted with a thick layer of gesso and then sprayed with blue and red dylusions sprays. The large mushrooms, leaves and the snail (hand carved from rubber) were stamped onto some background papers which had been smooshed with Distress Inks, and then cut out. The wooden mushies and small leaves, were  plywood embellies from Prima....  love this range! I've also added a gum leaf chippie, real gumnuts and flowers diecut from glassine paper. All of the ply and chipboard embellies were painted with 3D stamping paint. A piece of seam binding helped to secure the gumnuts in place. My fairy door hangr is ready for use.

Thank you for stopping by and for leaving your encouraging comments.
Cheers, Di

Saturday, 17 August 2013

Sun Fun

Hi and welcome. Today's layout is showing photos of  2 of my nieces and self (aged 4 years). These 2 are the closest to me in age, being 11 months and about 2 years younger (yes I was an aunty at 11months). I didn't know these photos existed until the day of my sister's funeral, when I was given 2 small photos (blown up for this layout). There was no information about where these were taken, but the when was probably after Christmas in 1955 or early 1956, because the doll I'm carrying was a Christmas present that year.
I'm glad the photos came into my possession although in sad circumstances, as they brought back many fond memories I had of spending time with my sister and her family. I know I often spent time with them especially after they moved to the tiny seaside village of Hastings Point on the far north coast of NSW. I knew that my foot was bandaged and it wasn't until tonight, that I remembered having trodden on a nail, and having to have my foot wrapped.... no such things as stretchy bandages then. It would have been made from cut / torn old sheet, and boiled in the copper to sterilise it. I really enjoyed my visits, as my nieces were more like younger sisters, my own siblings having all grown up and working, at this time.


I've gone with the bright colours of summer, with the backgroud papers and flowers. Some of these were commercial,  the rest were handmade, diecut from experiments using the gelli pad and gesso, acrylics and sprays.


Acrylics were used on the chipboard flourish and butterfly. These were then finished with glossy accents. The same product was also used on the lettering for the title.  The butterfly was also glued onto organza ribbon, trimmed and   completed with bits of bling. I found a tiny doll in the stash and dressed her in a folded flower.  


I am entering this layout into the ABAC Challenge, Summer  Fun inspired at:
http://anythingbutacard.blogspot.ca/

Thank you for visiting. i  hope  you come again.
Cheers, Di
             

Friday, 2 August 2013

Christmas in July

Hi! Oops! I almost forgot about this one! Well.. it has been one of those weeks! However, son is recovering quite well from his knee op. and is now navigating without crutches.
Christmas in July is something I don't normally do, but I have been very interested in seeing what the DT and other crafters have been up to for this challenge at:http://anythingbutacard.blogspot.ca/


I started with some heavily textured cream paper cut into a tag and painted 3D stamping paint over it (red and copper). This was put onto a red card stock background. I added some pieces of leftover papers from previous Christmas projects, and started layering. Stars were die cut from card stock, vellum and mirror board which had been alcohol inked. Metal stars, sequins, snowflakes and washi tape were added. Affirmations and image have come from Darkroom Door Filmstrips and Wordstrips.  
This is a very short post. Will catch up with you again soon.
Thanks for stopping by, and thank you for your positive comments and words of encouragement.
Cheers, Di

Tuesday, 16 July 2013

Steampunk Tag

Hi and welcome!
I've had my first go at producing something in the Steampunk mode... at least I hope it is! A lovely crafty friend, Judi, lent me her Chocolate Baroque set, with a gorgeous butterfly. It is this that I chose to use as part of a tag for the current ABAC Challenge 23 'Steampunk'. See what the design team has come up with at: http://anythingbutacard.blogspot.ca/
I started by covering a tag with self-adhesive aluminium plumbers flashing; embossed in 2 different folders, just to give a couple of different textures on the background. This was then smooshed with alcohol inks.

 
I thought that this didn't look quite old enough, so I smeared on some 3D stamping paint and when dry, lightly sanded back some of the raised sections.


The effect can't fully be seen here, but this did tone the colours back quite well.
The butterfly was stamped onto silver mirror board and coloured with permanent markers before being adorned with brass brads and bling.


Cogs were also die cut from the same card and inked with alcohol inks and Vintaj Patinas.


Roses were quilled from folded strips of aluminium kitchen foil. This took a little experimentation to find the right number of times to fold the strips so that they stayed intact. Alcohol inks were swiped across the petals, and Patina carefully tipped on and smoothed out with a small brush.
I completed the tag with a strip of lace from my stash.


This was an interesting challenge and it certainly took me in a new direction of experimentation.
 
What I used:
Alcohol Inks: Latte, Ginger, Espresso, Mushroom and Metallic Copper.
Vintaj Patina: Verdigis, Rust.
3D Stamping Paint: Black
 
Thank you for visiting and for your lovely comments.
Cheers, Di


Saturday, 6 July 2013

A Messy Journey

Hi! Just getting this in before the deadline at:http://anythingbutacard.blogspot.ca/ . This challenge (Number 22) certainly had me getting messy, sticky and inky! - some very interesting effects on my fingers!
I started by covering a piece of patterned card with Gel Medium. On this were placed punched flowers and other shapes, another layer of gel and a layer of tissue paper.


This was covered with gesso, spritzed with Dylusions Sprays and lightened with White Linen. When dry, a section was stencilled using 3D Stamping Paint. At this stage, I decided that I didn't really like the overall effect, so I added some more gesso over all of it (a thin layer) and when dry, smooched on Distress Inks, leaving a more subtle effect.


Various other pieces were prepared. This used the natural dyes from flowers and foliage: freshly picked, put between light card and rolled through the Cuttlebug:- very effective, but it can be rather messy because some plants are juicier than others. The rollers have to be cleaned as soon as you finish.


The stencil piece is a second generation stencilling. The original was quite bright (have kept it for something else). When gessoed it had been lightly spritzed with Dylusions. For the above, I flipped the stencil over and added just a little more gesso, drawing in any colour still left. I liked the effect it had of additional foliage in the background.


This is a piece of microfiche. The same stencil has been used, this time with the 3D Stamping paint.


The chipboard was smooshed with Distress Inks and then had Vintaj Patina brushed on to give more of an aged look.


The piece has a slightly textured finish and even though on card, still has a slightly metallic appearance.
 
 
Some stamping around the edges and a stamped film strip, have completed the front cover.


This cover and panelling are now the first part of "My Messy Journey" .... an art journal to hold information and samples of the messy experiments. Hopefully many pages will be added.
 
What I Used:
Distress Stains: Forest Moss, Peeled Paint, Shabby Shutters, Picket Fence (chipboard)
Vintaj Patina: Moss, Rust (chipboard)
3D Stamping Paint: turquoise, moss green, silver, blue ( large background, microfiche)
Dylusion Sprays: London Blue, Cut Grass, Lemon Zest, White linen ( background, stencilling)
Distress Inks: Mowed lawn, Forest Moss (background)
Archival Ink: Olive
Impasto Gel medium, Gesso
 
Thank you for visiting and for your encouraging comments.
Cheers, Di