Showing posts with label Delicata gold ink pad. Show all posts

Monday, 20 April 2015

IT'S GOLD!!!! A TAG FOR ABAC

At Anything But A Card this month, the focus has been on GOLD!
For this I have made a tag using black cardstock as a base. This was sprayed with gold glimmermist.


A butterfly was diecut from a manilla folder which started life as a mop up piece. It was sprayed with the gold mist as well, then dry embossed. The raised areas were highlighted with Delicata gold ink (absolutely THE best gold ink I've used). Some glittery blue sections were added using Viva Decor Perlen- pen.

The flower was made from glitter paper with an overlay of leaf skeletons (purchased), also inked with the gold ink and edged with the blue glitter. Gold pearl pen was also added to the glitter petals.
To finish the tag I added the stamped sentiment, woodchip butterflies and flower centre and gorgeous braid (black and antique gold).
Pop on over to:anythingbutacard and check out what other members of the team have done with our "Fool's Gold" theme. We'd love to see what you come up with (as long as it's not a card of course!)

Catch you again soon.
Cheers, Di

Monday, 22 December 2014

CARNIVALE MASQUE

Hi and welcome.  It's such a busy time of the year so  thank you for dropping by. Anything  But A Card, this month, has been delving into the theme "Celestial", which has meant quite varying things to members of the team.
After a play day at  timetocreate  exploring different ways to change background papers, one paper in particular screamed.. Celestial!!!!  The whole piece, once finished, reminded me of some distant planetary system with moons, satellites, planets. I originally was going to do a mobile featuring such planetary objects, but after a very vivid dream, and one which oddly for me stayed in my mind the day after, I came up with the idea of a festival mask.

Completed mask with photo edited on a night setting to show the glitter.

The background was a glossy black A4 card.  This had been daubed with metallic acrylic paints in copper and bronze.  radiating from these were lines of Viva metallic pens. In between we stamped with silver  and added imprints from the end of our daubers with gold 3D Stamping Paint.


Close-up of mask how it looked at first

To the mask shape cut from this background I added some gold glittered stars, (these have come up silver on this photo), stars cut from gold and copper-coloured mirror board (finished with Kindyglitz bling) and tinsel pipe cleaners bent into star shapes . I added additional silver finishes around the outside of the frame and eye slits ( dabbed on silver ink).

Mask shown in natural light
 I thought that this would be the finish but after further contemplation decided to add another element.. a "Man in the Moon cut from pearlised white card and edged with Kindyglitz. Unfortunately the eye details and edging have not shown up on these photos. The mask is held by hand. This leg has been made from a thin piece of dowel, with tinsel pipe cleaners twisted around it.


mask with the addition of a moon.


Thank you for stopping by. There's still time to get your celestial muses working. We'd love to see your art at anythingbutacard so  why not drop on over and have a look at the amazing pieces done by the rest of the team.

Cheers for now.
Di


Monday, 17 November 2014

UPCYCLING FOR ANYTHING BUT A CARD

Hi and welcome.
Today I'm sharing a quick upcycled project, one that lends itself to many different interpretations and themes... napkin or serviette rings.


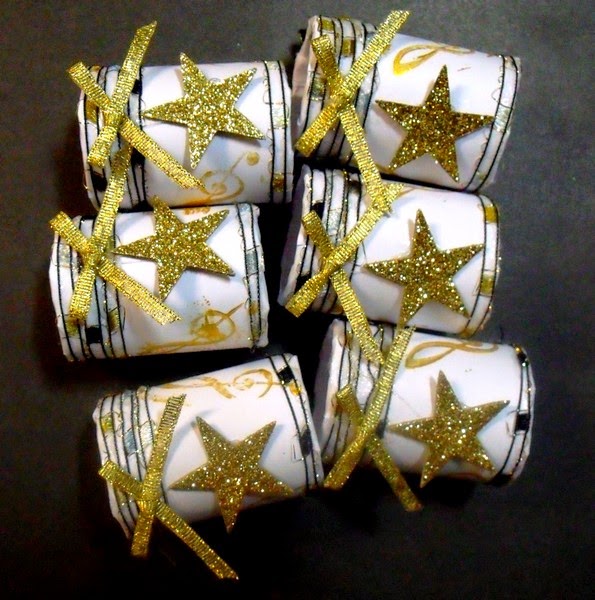
For this project I've used the inner roll from aluminium foil, cut into lengths. These were covered with stamped laser colour paper (a thin card). The ends were glued and wrapped with metallic yarn.  I added gold bows (shop bought) and small wooden stars coated with gold glitter flakes. A simple makeover, relatively fast to do... and it used up some bits and pieces I've had for some time.

There's still time to enter our challenge at Anything But A card this month... anything  goes as long as it isn't a card. We'd love to see what you could do for this. Pop on over to:anythingbutacard  and check out what the rest of the team has done, as well as the amazing entries that are already in.

Thanks for dropping by.
Catch you again soon.
Cheers, Di

Monday, 21 July 2014

ILLUMINATED POINTILLISM

Hi and welcome to my 100th post! This month at Anything But A Card, it's been... anything goes, so I decided to resurrect a couple of art techniques I often used in the classroom... illuminated lettering and pointillism.
These are fantastic techniques, but I've only used the basic ones for this project, using materials I had readily available, namely brush-tipped marker pens, gold metallic pens, 3D Stamping Paint and Inca Gold. Ideally I would have liked to have worked the lettering with gold leaf, but didn't have any in my supplies at the time. Pointillism is usually done with paint applied in layers of small dots (check out the artist Seurat). In the classroom this wasn't always a feasible method, because kids being kids, wanted to see as finished product on the day it was started, so I devised an adapted version using textas or marker pens and had them build up layers of colour on their art works. This also taught them a great lesson in blending of colours to produce depth and interest. For my little poster, I've combined the two methods.


 I started by lightly sketching my initial and then painted in the outline using a fine brush and gold ink ( Delicata gold stamp pad)


The background was sketched and then I started filling in the space with small dots of texta colour. To achieve the  depth of colour and variations in the landscape, I used different tones of the same colours.


I painted the whole of the letter in the gold ink, and added colour to it with metallic markers.  This then became the base colour for the next layers. Firstly, over painting with copper- coloured 3D Stamping Paint, then topping this with  Inca Gold, using a water brush. 


The coloured metallic ornamentation was topped with Glossy Accents, to make them look more
jewel-like. 


 This piece was added to background of black cardstock which had been stencilled, again with gold ink. Words were added with the same ink and Glossy Accents applied over the top. 

 
The whole piece was then mounted onto another background and inspirational text added as a border. I haven't decided how this is going to be displayed so it has not had anything attached for hanging.
 
Thank you for dropping by. There's still time to be involved in the challenge.. Anything Goes at Anything But A card. Why not pop on over to:  http://anythingbutacard.blogspot.ca/ and have a peep at what the rest of the team have done and also at the amazing entries we've received this month. I'm sure that you will certainly be inspired.
 
Cheers for now.
Di