Friday, 29 November 2013

Waterlilies

Hi and welcome. Just a very quick post showing a challenge layout for: http://unstampabelleschallenges.blogspot.com.au/ where the criteria was for the use of vellum and no stamping. This is a very late posting for this.


I've used a double matting of cardstock for  the background as well as a recycled "Monet" calendar print. Framework around the photo has been made from the stems cut from artificial flowers. Under the photo is my vellum matting with a hand-embossed waterlily.

 
Close up of the embossing..
 
Cheers for now. Thank you for visiting. Di

Thursday, 21 November 2013

Autumn Tag

Hi and welcome. Tags are becoming one of my favourite forms of mini-art. I've a long way to go, but am enjoying the experimentation process.
This tag is for the current challenge at Anything But A Card: Fall into Fall.  Pop on over to: http://anythingbutacard.blogspot.ca/  to see what the DT has been up to.


I used a Kraft tag for the base and smooshed it with gold metallic alcohol ink, as well as the colours previously used and left on the applicator. I loved the effect this made and it's one I'll use again. I was surprised to see how well a non-glossy surface took alcohol ink. the edges were swiped with Inca gold.


For the next layer I added a smaller tag made from a  metallic gold vellum. The edges of this were swiped with 3D Stamping paint. The next tag was made from acetate packaging, alcohol inked and then put through an embossing folder. On the front I rubbed on some Inca gold and 3d stamping paint. The leaves were die cut using the Tim Holtz Tattered Leaves die. These were also cut from acetate packaging and glossy cardboard packaging. The surfaces were treated the same way as the base with the addition of metallic gold alcohol ink.


Some images from Graphic 45 "Place in Time" collection and a snippet of an autumn poem from  an old poetry book (smooshed with Distress Ink) completed the tag. It was finished with a bow made from seam binding, spritzed and sprayed with Dylusions Inks, Glimmer mists and water.


Thank you for visiting and for your lovely comments.
 Cheers, Di.

Tuesday, 19 November 2013

Golden Tag

Hi and welcome. We've certainly had an interesting week of storms, wind and hail in our region over the past week. At home this has not been to the extent of towns nearby where, in some centres it certainly looked like a Northern winter scape!
In my exploration of challenge sites I came across "Lets get Shabby Challenge" blog and decided to put an entry into their latest challenge ( just getting it in!), which is themed on "Gold". For this challenge at: http://letsgetshabby.blogspot.com.au/  I decided to make a tag. This was cut from a pearlised glittery cardstock which was coloured with gold metallic alcohol ink. Even though this card only had a soft satin sheen to it, the alcohol ink took well without any bleeding on the underside.
On the background I've stamped a steam punk rose image from Chocolate Baroque's steampunk butterfly set. This was coloured using 3d Stamping Paint.


The flowers were quilled from different gold papers, including a soft metallic gold vellum.


Some layering with corrugated cardboard, Tim Holtz tissue paper, diecut cog and ribbons were also used.  Around the edges I've added a random border of mica flakes.


 Thank you for visiting. I really appreciate your encouraging comments.
Cheers, Di

Friday, 15 November 2013

Alina the Fair

Hi and welcome.
A beautiful  mixed media artwork, "Listen" by Jenny Grant is the inspiration piece at ARTastic this month. Check out the stunning DT inspiration pieces at:http://artasticchallengeblog.blogspot.com.au/  I really enjoy this style of artwork and for the challenge this month decided to do a canvas piece using a mix of different mediums.
I used a canvas board for the background surface. This was  painted with black gesso and while it was still damp, I sprinkled on Perfect Pearls powders and spritzed with water. I also spritzed with Perfect Pearls mists.


Zentangling has been a feature in some of my projects this year, and this time I chose to draw a faerie face on cardstock and gave her a tangle of tresses, some of which have been zentangled. Alina, (the name I have given this faerie) was  looking too stark against the background so I lifted her tones using Lyra Aquarelles.


I don't know what I was thinking of when I outlined the face in black!!!! Just got carried away... anyway the jawline had to be softened. This was done using a blend of Picket Fence Distress Stain and the Aquarelles.


Before attaching the piece to the canvas board, I sprayed with a fixative. Alina's headpiece was beaded and finished with a metallic flower embellishment (Tim Holtz). This was coloured using 3D stamping paint. The other metal pieces on the canvas were also coloured the same way.


To complete Alina's coiffure I added metallic yarn, a piece from a Christmas decoration and 3D Stamping Paint to suggest movement and to give an extra pop of colour.


The outside edge  of the canvas was painted with the 3d stamping paint as well.

Thank you for stopping by and for leaving encouraging comments. these are truly appreciated.
Cheers, Di.

Saturday, 2 November 2013

FARM IDYLL

Pixels and Paper Challenge for November.
The challenge at Pixels and Paper this month is about chickens, inspired by this picture.


Of course your page doesn't have to be about chickens at all - perhaps you see the wider picture of a farmyard and would like to tell the story of a trip to the countryside or visit to a working farm. Maybe your child has visited a farm as part of a school trip or raised chicks as a classroom project. You might even like to think laterally on this one and explain your love of egg based dishes! Bacon and eggs anyone?

Pop on over to: http://pixelsandpaperchallengeblog.blogspot.com.au/ to see what the Design Team have come up with for this challenge.


My take on this was based on a photo taken of my husband and our first car way back in '74 / '75. At this time we were renting an old farmhouse. Although we didn't have any form of poultry at this location, we did have paddocks around us where hereford cattle were mainly kept by our landlord. The house paddock often had the cows about to give birth in them and my husband sometimes had to assist the farmer with the deliveries or let him know when the new born calves had arrived. The car shed was very old and ramshackle. We didn't use it very often, particularly when we discovered that it was the residence of a red-bellied black snake... and that's a whole other story !!


The background papers were cut, inked and painted (combinations of distress inks, stains and archival inks). Stencilling was used for the tree, and freehand dabs of various stains added for foliage. The roof of the die cut shed was made from corrugated cardboard packaging which was smooshed with Rusty Hinge distress ink. The pond was an experimentation with a gellipad and the rooster cut from Graphic 45 papers. The photos of the ducks were also cut out. On the page I've also used dried grass for reeds and a Dusty Attic chipboard barbed wire fence.
I hope you are inspired to join us for the challenge. We'd love to see your work.
Thank you for stopping by and for your lovely comments.
Cheers, Di.


Thursday, 24 October 2013

Chillin' Out!

Hi and welcome. We've had a little relief from the hot, dry conditions here,with some mizzly, welcome rain. In other areas of NSW bushfires are lessening  which is great news for all of those involved in the firefighting efforts.
As well as completing layouts for some challenges I've been experimenting with some ideas for a girl's group (10 -  12 yr olds) who meet in their lunch hour once a week for various activities. I've been asked to do a Christmas activity with them and apart for what I've already planned (will show you when completed), I would  like to also come up with a small, quickly-made gift they could make. If anyone has any ideas, could you share?
Today's layout is showing photos of a tawny frogmouth taken in early January, 2010. It was a particularly hot day with temps in the mid 30's (degrees C), and no breeze whatsoever. To get some relief from the heat, this tawny (and there were 2 others  in the tree)  sprawled out on a branch  (the tree is in my front garden), with its wings on either side. It just seemed to be balanced there. It mustn't have been too uncomfortable, because it remained in this position for at least half an hour. I was lucky to get photos of it as it was spreading its wings to get cooler. I love the look on the tawny's face... it reminds me of  'Animal' from the  Muppets.


The challenge at ARTastic this month is to use wood &/ or feathers. Pop on over to
 http://artasticchallengeblog.blogspot.com.au/   to see what the inspirational art work is, and what the fabulous Design Team have come up with.


I've had the paper in my stash for some time. The edges of the tree and owl paper were moistened before distressing and rolling.  I also used gesso over a stencil and while damp, sprayed it with green  and chocolate dylusions sprays...... what a surprise to find when the leaves dried that the ones sprayed with chocolate colour  had turned ... PINK!!! ... not the colour I wanted. Back went the stencil and a good layer of 3D Stamping Paint added. The wooden feathers were sprayed with chocolate coloured dylusions and wrapped with twine to resemble the tawny feathers. Thickers in the title were painted with liquid pearls.
Thank you for visiting and for leaving your positive comments.

Saturday, 19 October 2013

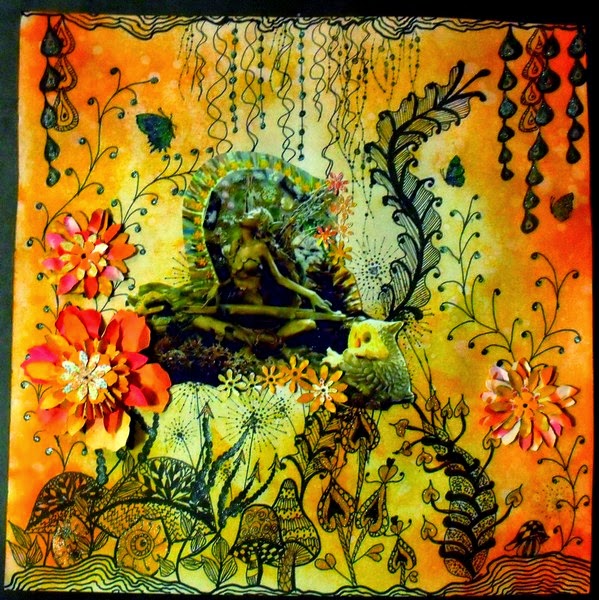
ENCHANTED GLADE (with Zentangles)

Hi and welcome. It seems like ages since my last post, but I am still having a bit of a nerve problem in my hand, so some activities are limited. However, I have had a couple of fabulous playdays/ classes with friend Julie at:http://timetocreate-handmadetreasure.blogspot.com.au/. It was great to get back together with friends to create some amazing pieces.
This layout is for the current challenge at ABAC, where the criteria is for orange or orange and  black.  Pop on over to http://anythingbutacard.blogspot.ca/    to see what the DT members have done for this.
I've gone for a fantasy theme. The background was doodled first, creating the glade. Some newly purchased Chocolate Baroque stamps (lovin' these!) were used for some extra detail.


The whole background was then smooshed with Distress Inks (Wild Honey, Dried Marigold, Spiced Marmalade and Ripe Persimmon). After attaching the photo and adding die cut flowers (again from smooshed and inked paper) I highlighted some sections with 3D Stamping Paint (blue and copper) to give a bit of sheen.


            Some close-ups of the layout... trying to show the effect of added 3D paint, and stamping.

I have used the fairy composition in the photo before, in a different setting and colour. She is a favourite of mine and may appear again sometime in the future, with some changes. I rather enjoy making different scenarios for her.
Thank you for visiting. It's always a pleasure to read comments that are left.
Cheers, Di