Hi and welcome. We've had a little relief from the hot, dry conditions here,with some mizzly, welcome rain. In other areas of NSW bushfires are lessening which is great news for all of those involved in the firefighting efforts.
As well as completing layouts for some challenges I've been experimenting with some ideas for a girl's group (10 - 12 yr olds) who meet in their lunch hour once a week for various activities. I've been asked to do a Christmas activity with them and apart for what I've already planned (will show you when completed), I would like to also come up with a small, quickly-made gift they could make. If anyone has any ideas, could you share?
Today's layout is showing photos of a tawny frogmouth taken in early January, 2010. It was a particularly hot day with temps in the mid 30's (degrees C), and no breeze whatsoever. To get some relief from the heat, this tawny (and there were 2 others in the tree) sprawled out on a branch (the tree is in my front garden), with its wings on either side. It just seemed to be balanced there. It mustn't have been too uncomfortable, because it remained in this position for at least half an hour. I was lucky to get photos of it as it was spreading its wings to get cooler. I love the look on the tawny's face... it reminds me of 'Animal' from the Muppets.
The challenge at ARTastic this month is to use wood &/ or feathers. Pop on over to
http://artasticchallengeblog.blogspot.com.au/ to see what the inspirational art work is, and what the fabulous Design Team have come up with.
I've had the paper in my stash for some time. The edges of the tree and owl paper were moistened before distressing and rolling. I also used gesso over a stencil and while damp, sprayed it with green and chocolate dylusions sprays...... what a surprise to find when the leaves dried that the ones sprayed with chocolate colour had turned ... PINK!!! ... not the colour I wanted. Back went the stencil and a good layer of 3D Stamping Paint added. The wooden feathers were sprayed with chocolate coloured dylusions and wrapped with twine to resemble the tawny feathers. Thickers in the title were painted with liquid pearls.
Thank you for visiting and for leaving your positive comments.
Thursday, 24 October 2013
Saturday, 19 October 2013
ENCHANTED GLADE (with Zentangles)
Hi and welcome. It seems like ages since my last post, but I am still having a bit of a nerve problem in my hand, so some activities are limited. However, I have had a couple of fabulous playdays/ classes with friend Julie at:http://timetocreate-handmadetreasure.blogspot.com.au/. It was great to get back together with friends to create some amazing pieces.
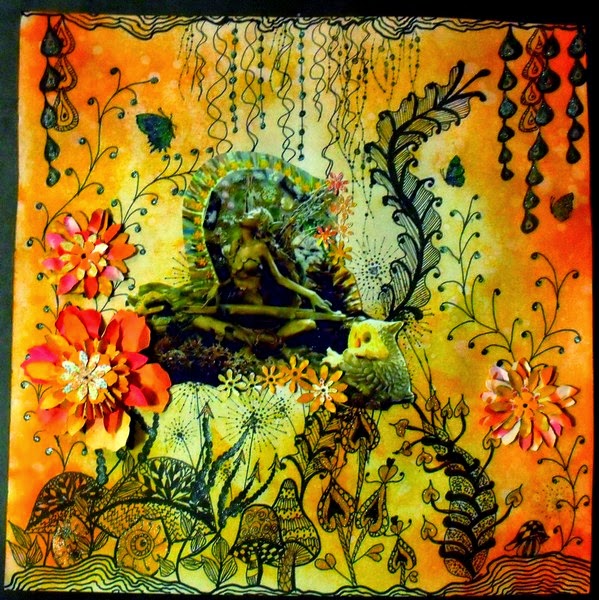
This layout is for the current challenge at ABAC, where the criteria is for orange or orange and black. Pop on over to http://anythingbutacard.blogspot.ca/ to see what the DT members have done for this.
I've gone for a fantasy theme. The background was doodled first, creating the glade. Some newly purchased Chocolate Baroque stamps (lovin' these!) were used for some extra detail.
The whole background was then smooshed with Distress Inks (Wild Honey, Dried Marigold, Spiced Marmalade and Ripe Persimmon). After attaching the photo and adding die cut flowers (again from smooshed and inked paper) I highlighted some sections with 3D Stamping Paint (blue and copper) to give a bit of sheen.
Some close-ups of the layout... trying to show the effect of added 3D paint, and stamping.
I have used the fairy composition in the photo before, in a different setting and colour. She is a favourite of mine and may appear again sometime in the future, with some changes. I rather enjoy making different scenarios for her.
Thank you for visiting. It's always a pleasure to read comments that are left.
Cheers, Di
This layout is for the current challenge at ABAC, where the criteria is for orange or orange and black. Pop on over to http://anythingbutacard.blogspot.ca/ to see what the DT members have done for this.
I've gone for a fantasy theme. The background was doodled first, creating the glade. Some newly purchased Chocolate Baroque stamps (lovin' these!) were used for some extra detail.
The whole background was then smooshed with Distress Inks (Wild Honey, Dried Marigold, Spiced Marmalade and Ripe Persimmon). After attaching the photo and adding die cut flowers (again from smooshed and inked paper) I highlighted some sections with 3D Stamping Paint (blue and copper) to give a bit of sheen.
Some close-ups of the layout... trying to show the effect of added 3D paint, and stamping.
I have used the fairy composition in the photo before, in a different setting and colour. She is a favourite of mine and may appear again sometime in the future, with some changes. I rather enjoy making different scenarios for her.
Thank you for visiting. It's always a pleasure to read comments that are left.
Cheers, Di
Wednesday, 2 October 2013
BIRTHDAY MEMORIES
Hi and welcome. Today I'm sharing my take on the October Challenge for Pixels and Paper where the inspiration was candles. Maybe you think of celebrations, light and shadows, colours seen in the photo, or the number 11 (there being 11 candles).
This is a great photo to take inspiration from. Pop over to Pixels and Paper at: http://pixelsandpaperchallengeblog.blogspot.com.au/ to see what the design team has been up to.
I've chosen to go with the birthday theme, but have also used some of the colours that can be seen in the inspiration photo.
The photos I've used are of my son's 4th birthday afternoon tea party, with his Nan and Pop. he had 2 cakes, one made by Nan (chocolate and cherries) and one made by me (taken straight from the Australian Woman's Weekly Birthday Cake Book), decorated in the form of a clock face. So, 2 lots of candles to blow out and 2 cakes to cut! Cherries were a particular favourite of my son's at this time, and many escaped to his plate before the cake was cut!
I didn't do too much with the background cardstock; just some stamped balloons and sentiments, as it was great the way it came. Since it was a birthday I just ran a couple of lengths of washi tape down and across the page, to make it look like a ribbon around a present.
The photos were double mounted, and glitter quilling paper was used to wrap the mounting cardstock sheets, as well as forming the Number 4 on the candle. The candle was cut from one of my stencilling experiments, involving acrylics and distress inks. The flame was cut from acetate packaging, and alcohol inked. Outsides of the various elements were swiped with 3D Stamping Ink for a bit of extra glitter.
Thank you for visiting and I would love to see your work at this month's challenge.
Cheers, Di
This is a great photo to take inspiration from. Pop over to Pixels and Paper at: http://pixelsandpaperchallengeblog.blogspot.com.au/ to see what the design team has been up to.
I've chosen to go with the birthday theme, but have also used some of the colours that can be seen in the inspiration photo.
The photos I've used are of my son's 4th birthday afternoon tea party, with his Nan and Pop. he had 2 cakes, one made by Nan (chocolate and cherries) and one made by me (taken straight from the Australian Woman's Weekly Birthday Cake Book), decorated in the form of a clock face. So, 2 lots of candles to blow out and 2 cakes to cut! Cherries were a particular favourite of my son's at this time, and many escaped to his plate before the cake was cut!
I didn't do too much with the background cardstock; just some stamped balloons and sentiments, as it was great the way it came. Since it was a birthday I just ran a couple of lengths of washi tape down and across the page, to make it look like a ribbon around a present.
The photos were double mounted, and glitter quilling paper was used to wrap the mounting cardstock sheets, as well as forming the Number 4 on the candle. The candle was cut from one of my stencilling experiments, involving acrylics and distress inks. The flame was cut from acetate packaging, and alcohol inked. Outsides of the various elements were swiped with 3D Stamping Ink for a bit of extra glitter.
Thank you for visiting and I would love to see your work at this month's challenge.
Cheers, Di
Saturday, 28 September 2013
Bookmark
Hi and welcome. Sorry I have been so tardy in visiting your blogs, but I've had the flu and I've strained tendons in my right hand from some over-zealous gardening!...absolute nuisance as it has restricted what I'm able to do. Hopefully it is on the mend.
At http://anythingbutacard.blogspot.ca/ this month's challenge was about books. What I had planned for this didn't happen, instead I've decided to go with a bookmark, using vellum, page from an old poetry book, and cardstock.
The vellum design was drawn with a very fine sharpie pen and coloured using Lyra pens. The images were then dry embossed on the reverse side, to give them a raised look. The outline was pierced (just like pin-pricking) and torn to give a lace-look edging. A border was done in a silver permanent liner. An additional butterfly was done in the same manner from vellum, fussy cut and placed over the original one. This top butterfly was given a fairly dry brushing of 3D Stamping Paint to give a slight sheen. The vellum was mounted to the poetry page using brads. This was then roughly torn to the same shape as the vellum layer. Both layers were then placed on cardstock layers. Punched flowers were added around the edge. These were left-over cardstock from Distress Ink experiments. With these in position, the bookmark edge was fussy cut to follow the line of flowers.
Added butterflies were punched from left-over poetry and old manuscript music bits. A beaded edge was added. Because I decided to go with the 3-D look for this bookmark, a length of wide ribbon was added for the marking of the page inside a book, so that the rest of the bookmark resides on the cover.
The outer edge of the bookmark was also finished with the 3D stamping paint.
Thank you for looking and for continuing to leave positive comments. These are truly appreciated and I look forward to catching up with everyone as as soon as possible.
Cheers, Di.
At http://anythingbutacard.blogspot.ca/ this month's challenge was about books. What I had planned for this didn't happen, instead I've decided to go with a bookmark, using vellum, page from an old poetry book, and cardstock.
The vellum design was drawn with a very fine sharpie pen and coloured using Lyra pens. The images were then dry embossed on the reverse side, to give them a raised look. The outline was pierced (just like pin-pricking) and torn to give a lace-look edging. A border was done in a silver permanent liner. An additional butterfly was done in the same manner from vellum, fussy cut and placed over the original one. This top butterfly was given a fairly dry brushing of 3D Stamping Paint to give a slight sheen. The vellum was mounted to the poetry page using brads. This was then roughly torn to the same shape as the vellum layer. Both layers were then placed on cardstock layers. Punched flowers were added around the edge. These were left-over cardstock from Distress Ink experiments. With these in position, the bookmark edge was fussy cut to follow the line of flowers.
Added butterflies were punched from left-over poetry and old manuscript music bits. A beaded edge was added. Because I decided to go with the 3-D look for this bookmark, a length of wide ribbon was added for the marking of the page inside a book, so that the rest of the bookmark resides on the cover.
The outer edge of the bookmark was also finished with the 3D stamping paint.
Thank you for looking and for continuing to leave positive comments. These are truly appreciated and I look forward to catching up with everyone as as soon as possible.
Cheers, Di.
Saturday, 21 September 2013
FANTASY GARDEN
Hi and welcome on this glorious spring day! Perfect weather for gardening and that's what I'd been doing earlier.
This month's challenge at:http://artasticchallengeblog.blogspot.com.au/ is all about fun and quirky! Well, if my garden plants were anything like the ones on my layout, they would certainly fit this criteria! I certainly had fun, firstly doodling the background, them adding the pops of colour by making flowers.
I've been doodling for years, and certainly used this as an art technique for students in my classes to make art works and book covers, so imagine my surprise when I discovered that this technique is now called zen tangling! I picked up a book ( The Art of Zentangle) last week to see what was different, and discovered the extent to which this form of doodling has taken... very interesting indeed!
The dies used for the flowers were T.H: Tattered Flower Garland, Tattered Florals and Mini Paper Rosettes. The photo is of a protea I used to have in the garden, but unfortunately, no longer.
To complete the layout, I used Lyra aquarelles, to give a random wash around some of the doodles.
Thank you for visiting.
Cheers, Di.
This month's challenge at:http://artasticchallengeblog.blogspot.com.au/ is all about fun and quirky! Well, if my garden plants were anything like the ones on my layout, they would certainly fit this criteria! I certainly had fun, firstly doodling the background, them adding the pops of colour by making flowers.
I've been doodling for years, and certainly used this as an art technique for students in my classes to make art works and book covers, so imagine my surprise when I discovered that this technique is now called zen tangling! I picked up a book ( The Art of Zentangle) last week to see what was different, and discovered the extent to which this form of doodling has taken... very interesting indeed!
The dies used for the flowers were T.H: Tattered Flower Garland, Tattered Florals and Mini Paper Rosettes. The photo is of a protea I used to have in the garden, but unfortunately, no longer.
To complete the layout, I used Lyra aquarelles, to give a random wash around some of the doodles.
Thank you for visiting.
Cheers, Di.
Saturday, 7 September 2013
Finally, an art journal!
Hi and welcome. Just a very quick post, sharing the beginnings of an art journal... something I've had on the back burner to do but never seemed to find the time to actually start. Thanks to Julie's mini-challenge this week at http://anythingbutacard.blogspot.ca/ I've actually made a start!
It's going to be a working journal of my experiments with paints, inks, sprays and other mediums and how these react on various papers and background surfaces.
Stage 1 of front cover... gesso, Dylusion sprays and stencilling. This ended up as a surprise. After gessoing and spraying over the stencils, I didn't like the result so gessoed over the whole lot. I used a different stencil, sprayed and then spritzed the rest of the area with Dylusions and Perfect Pearls Mist and let it run. As it dried, SURPRISE!! the top layer started sinking and some of the bottom layer started appearing... INTERESTING!!!! LOVE IT!!!!!
The writing isn't perfect, neither are the samples.. it's how they have turned out. What I'm planning to add at some stage, will be samples or photos, of how and were some of these techniques have been used.
Thank you for visiting and for your continued positive comments.
Catch you again soon.
Cheers, Di
It's going to be a working journal of my experiments with paints, inks, sprays and other mediums and how these react on various papers and background surfaces.
Stage 1 of front cover... gesso, Dylusion sprays and stencilling. This ended up as a surprise. After gessoing and spraying over the stencils, I didn't like the result so gessoed over the whole lot. I used a different stencil, sprayed and then spritzed the rest of the area with Dylusions and Perfect Pearls Mist and let it run. As it dried, SURPRISE!! the top layer started sinking and some of the bottom layer started appearing... INTERESTING!!!! LOVE IT!!!!!
The writing isn't perfect, neither are the samples.. it's how they have turned out. What I'm planning to add at some stage, will be samples or photos, of how and were some of these techniques have been used.
Thank you for visiting and for your continued positive comments.
Catch you again soon.
Cheers, Di
Monday, 2 September 2013
Bouquets For A Special Day
Hi and welcome.
This is the inspiration image for this month's challenge, at: http://pixelsandpaperchallengeblog.blogspot.com.au/ so pop on over to see what the rest of the team has done.
The chipboard flourish was heat embossed with Opals embossing powder.
The flowers in our bouquets were made extra special as they featured orchids which had been grown by my dad.... even more special memories!
The challenge is open to any interpretation. We'd love to see you join in.
Thank you for visiting and for leaving such lovely comments. Welcome also to my new followers.
Cheers, Di
This is the inspiration image for this month's challenge, at: http://pixelsandpaperchallengeblog.blogspot.com.au/ so pop on over to see what the rest of the team has done.
The layout I did for my DT piece at Pixels and Paper brought back very special memories of a very special day, 40 years ago.... yes, September 1st marked our 40th Wedding Anniversary!
The background paper was a beautiful piece which had a gorgeous lace design on it, so it was left as it was. Ovals were cut from different papers. One was a piece I had sprayed flowers on for previous projects, so I'd been left with a lovely stencilled piece.
Before attaching handmade flowers, I cut up a coloured photo of the bouquets and added them in. Flowers were made according to the tutorial by Jennie http://jennie-livethedream.blogspot.com.au/
(Some are supposed to be roses, by not as good as Jennie's... I need a lot more experience to have them looking as gorgeous!!)
The chipboard flourish was heat embossed with Opals embossing powder.
The flowers in our bouquets were made extra special as they featured orchids which had been grown by my dad.... even more special memories!
The challenge is open to any interpretation. We'd love to see you join in.
Thank you for visiting and for leaving such lovely comments. Welcome also to my new followers.
Cheers, Di
Subscribe to:
Posts (Atom)