Monday, 21 April 2014

SPRING INSPIRED


Hi and welcome! What a glorious autumn weekend we have had in this part of the world... clear blue skies, sunny days and a wealth of autumn flowers bursting out. I must say, the temperatures, although cooling in the evenings, are still quite warm during the day... more reminiscent of our springs. Our tawny frogmouth visitors have been back and it has been such a pleasure seeing them again.
Over on Anything But A Card Spring has certainly sprung, with fabulous ideas to tantalise the creativity in you.
This time, I used the Sizzix 3D  Accordioin Flip Album die to create a little piece to display some spring inspired verses and affirmations. This die is fast becoming a firm favourite and it is certainly going to be having quite a workout in the next couple of weeks leading up to Mother's Day here.
Some of my backgrounds were experimental pieces, gessoed, sprayed, smooshed, just to see what the effects would be like. Others were papers  from  various bits and pieces I had left over. All have been mounted onto a cream card stock.


This is a little photo heavy, but I wanted to show you the project at various stages. So far  I've only fully completed one side, but the reverse has been prepared waiting some more inspirational verses which can be easily placed.
 
Front
 
 
Reverse
 
                                                                       
While the panels were still flat I added stamping and the embellishments I wanted to use. The first time I made one,  I made the mistake of not putting on all of the embellishments before final construction. This turned it into quite a challenging project to complete.. so, lesson learnt!
 
 
Panels with embellishments, stamping and inspirational verses and affirmations


First panel


Inside panels


As you can see I took the title SPRING to form a separate panel for each of the letters in the title. The thickers were fabric ones that I coloured with permanent ink (Sharpies) and then completed with glossy accents. This gave them a faux porcelain look. Other finishing touches included lace flowers, bling and a touch of Kindyglitz for a bit of extra sparkle.
You still have a week to play with us, so come on over to:http://anythingbutacard.blogspot.ca/ to see the inspiration on offer. We'd love to see your art here.
Thanks for stopping by and for your very much appreciated comments.
Cheers, Di.

Created for: Anything But A Card DT

Wednesday, 16 April 2014

WASHING BASKET ROCK AND ROLL!!!

Hi and welcome.
ARTastic has been running a fun-filled challenge this month, celebrating those memorable, candid and sometimes silly moments.
 Pop on over to the site at:http://artasticchallengeblog.blogspot.com.au/  to see the art inspiration and what the rest of the DT has been up to... you're in for a treat!
Usually when the silly, spontaneous moments happen, a camera isn't in sight, but sometimes you strike it lucky, as I did when I took these photos of my son.


These were taken when he was about 13 months old and confidently walking/running. One of his favourite activities was to climb into my washing basket and rock himself around the yard. There were often the WHOOPS!!! moments, but he always came up laughing and very pleased with himself.
The background started life out as a wipe-off sheet and underlay sheet for sprays. The result of this was a very bright and not totally covered piece of card stock. To tone the colours down and to complete the background under layer, I sprayed sections over with Dylusions Ink.. Chocolate, and smooshed in Distress Inks... brown tones, bundled sage and wild honey.


To create the texture of the basket, out came a favourite medium of mine at the moment.. gesso. The stencil used kind of gave this look, so gesso was applied to the base colours, while they were still slightly damp. I like the interesting effects this gives when the colours combine.


Some sections were still too bright so an additional layer was added on top of the gesso with Dylusions ink.. White linen... love this loo on paper! The stencil was placed roughly in a circular pattern to give the idea of motion.


To complete the layout I added a border of random stamping as well as sections around the photos. A Sn@p - Simple Stories piece and other bits and pieces were added..including a film strip design washi tape.
Thank you for visiting and for leaving your lovely comments. These are always truly appreciated.
You still have time to enter this fun challenge and to show off the silly moments in your life. Come on over.. we'd love to see your art  here.
Cheers, Di.

Tuesday, 1 April 2014

THOSE HATS!!!

Hi and welcome. This month, Pixels and Papers have a delightful inspirational photo of more formal times, to share with you.


Pop on over to: http://pixelsandpaperchallengeblog.blogspot.com.au/  to also see what the rest of the team members have done to also inspire you.
I decided to combine the Easter theme with the show theme (Sydney's Royal Easter Show is such a major event on the show calendar).


The photo I've used shows myself (on the left) and two sisters, granddaughters of my mum's best friend.  My mum and I used to go for morning teas to either their Nana's house or to their mum's house once a week.This was a ritual which lasted for many, many years. Since I didn't have a grandmother, I adopted theirs and she became Nana to me as well, and that's what I always called her.
While we weren't dressed in our Sunday best, we certainly were dressed in the height of fashion for the show. What were our mum's thinking of!... those hats. I remember them being made of straw with very bright raffia flowers. At least they kept the sun off our faces.
Easter meant going to church services, meeting up with friends and family and of course... the eggs.  Mostly these were candy eggs, with their pastel colours. Occasionally I had the luxury of a chocolate egg with gorgeous rich, foiled paper on the outside.


I've replicated the feel of these by using a pastel-coloured background. The photo is popping out of an opened egg. This started off with a gelli plate print using metallic acrylics and glimmer  mist sprays. For the creased foil look I added gesso through a stencil. The doily was sprayed with glimmer mist and crinkle foil placed under it.
To complete the layout I scribbled around the letters of the title as well as the edges of the page. I quilled flowers to make them look like the raffia flowers on the hats and added some lace. Journalling has been done on tags. Some sticker strips I've had for years were finally used on this piece as well.

I hope you will come and play with us.We'd love to see your art creations.
Thank you for visiting and for leaving your comments.
Cheers, Di.

Monday, 31 March 2014

AURORA.... and 5 for the mini challenge

Hi and welcome. This is just a quick blog to show what I have done for the new mini challenge at Anything But A Card, to be set on the 5th Sunday of the month.
This first challenge is to use 5 items on your art works.
I've done a layout using 5 different components, but also using 5 silver  stamped nautilus shells to hold the photo.


The photo was taken at dawn in 2010, at a beach nearby. A group of us were on a craft retreat, and this was a perfect time of the day for these photos. I was up by about 5am to get the shots and stayed watching the sky go from the black of night with the red - orange sun peeping over the horizon, to these pale dawn shots with the sky turning a soft grey and pink.
The oval framework was stamped using a nautilus shell design from the Inkadinkadoo gears and cogs set. This was outlined with beads and glitter.
The title was from glitter chipboard. The silver nautilus shells were stamped with 3D Stamping paint.
Pop on over to:http://anythingbutacard.blogspot.ca/  to see what other members of the design team have done for this mini challenge.
We'd love to see your art here.
Cheers, Di

Monday, 17 March 2014

RHAIS WILL CERATINLY SPARKLE!

Hi and welcome to a sparkling challenge:- Number 33 at: http://anythingbutacard.blogspot.ca/  which has a week remaining to join us.
I've been working on canvases a fair bit lately and this time decided to use 2 of them, hinged together so that they could form the exterior and interior of a fashion salon "Couture Roses", the favourite for Rhais, the fabulously effervescent Parisian socialite who does so much for charities.


The canvases were painted with black gesso on the exterior face and inside frames. The walls were papered with a soft pearlised and metallic cardstock. To this I added a chipboard chandelier, painted with 3D stamping paint with lights highlighted with glossy accents.


The same treatment was given to a large chipboard rose:the signature motif for the salon. The frame of the mirror has been rubbed with Inca gold and 3D stamping paint to give an antique look.
Graphic 45's 'Couture' papers have featured on this canvas from the photos of past models and advertising, the sign 'Couture' and of course, Rhais.


Rhais will certainly sparkle at her Charity Dinner/Dance in her gown featuring the new vogue dropped waist, softly draped and held by her favourite flowers. The hemline, trimmed with the same flowers, drops to a short train. Thin straps sewn with rhinestones add to the glamorous appearance of this gorgeous gown. The gown will be further enhanced by the long string of diamonds being held by Rhais.


To complete the salon, a curtain from sheer fabric, bling and  handmade roses have been added.


The roses, were die cut using Tim Holtz tattered florals dies  and made up in the manner given by Jennie in her fabulous tutorial. You can see this tutorial and others, at:
Instead of using water, I sprayed the flower with Perfect Pearls mists. When dried they were brushed lightly with 3D Stamping  Paint.     
I hope you've enjoyed visiting Rhais's favourite salon.
Remember to pop over to Anything But A card to see what the rest of the design team have been playing with. We'd love you to join us.
Thank you for stopping by.
 
Cheers, Di.                                                                

Sunday, 16 March 2014

BIRDS OF A FEATHER?!!!!

Hi and welcome. The inspiration for this month's challenge at ARTastic is to include texture.... a great source of inspiration for me, particularly lately, as I have been exploring and playing with  inky, painty and gooey things and what happens when they are used together!


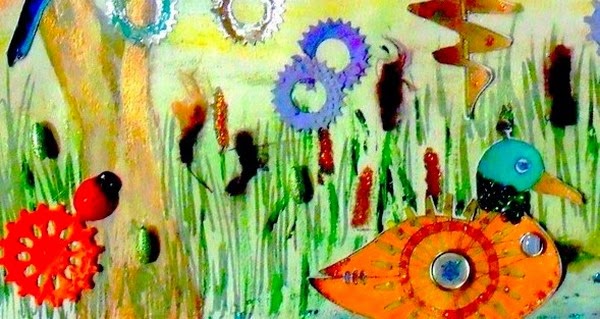
My piece for this ended up as a painted scene on a heavy watercolour A3 paper. Acrylics and texture paint were used to create the background scene and some of the features (tree and dove cote). 3D stamping paint was added in other areas (pond, parts of birds, and cogs). The birds were stamped with my new Chocolate Baroque Steampunk set...lovin' this!


                                          Close up of owl and doves!!! and dove cote


                                             Close up of parrots showing beading and cogs


                                                    Duck and bulrushes, cog flowers.
                                
They were coloured using metallic gel pens,  Lumiarte acrylic pigments and Silks acrylic glazes. To give more texture to the wings, I glued on micro- beads.
Cogs were made from aluminium flashing, embossed and painted with Vintaj patinas. Wool ans single beads were used for the bulrushes.


A bit quirky, but a lot of fun in the making.
There's still time to join in our challenge at ARTastic. Pop on over to:http://artasticchallengeblog.blogspot.com.au/  to see what our inspiration picture was and the fabulous artworks by the rest of the team. We'd love to see your art here.

Thank you for stopping by. Catch you again soon.
Cheers, Di.

Saturday, 1 March 2014

TWISTED LIGHT

Hi and welcome. Think of rainbows and misty rain and you'll have the perfect inspiration at Pixels and Paper this month. Interpret this photo as you wish and come and join us.


Pop on over to: http://pixelsandpaperchallengeblog.blogspot.com.au/  to see what the rest of the team has done for this month's challenge.
My take on this photo was to take the colours of the rainbow as a background for my layout. This was done with a piece previously gessoed and spritzed with dylusion ink sprays (a second generation print).


 To make a more uniformly covered background I swiped it with distress stains and then oversprayed with white dylusion ink to soften the colours more and to help them blend onto each other.
 

Images were stamped onto tissue paper and attached to the background with collage pauge.


A mauve vellum overlay was added to give the whole piece a misty, soft, luminescent appearance.
This w also stamped and streaked with Kindyglitz (falling raindrops).
.
 
Close up of 'rain' streaks
 
 
Close up of stamping and die-cut leaves
 
The photo was taken along the Huon River in Tasmania, just after a passing shower. We intentionally made sure that the sun's glow was a feature, but it was a surprise to see the effect of the twisted light when the photos were viewed later and then developed..... cool effect!


Thank you for visiting and leaving your lovely comments. Come and play with us at Pixels and Paper. We'd love to see your art.
Have a great weekend.
Cheers, Di.