Monday, 28 January 2013

String Prints

Hi and welcome. Today I'm showing a very old method of printing, which I first used at Teacher's College, and then again with a number of students in classes during the years I was teaching. This string block method is also my entry for ABAC Challenge 11, where you were to feature anything that could be theoretically tied. Pop on over to http://anythingbutacard.blogspot.ca to see the DT makes and other great entries.
Mark-making, as my friend Julie at http://timetocreate-handmadetreasure.blogspot.com.au often advocates, is a fantastic way to make a unique paper, and with printing marrying up with other techniques you truly will have something that cannot be replicated, even by yourself. It allows for experimentation using different mediums and is a great way to alter those 'unloved' papers that often languish around in our stash.
String block printing is a simple process. All you need are: blocks of wood (I've used pine off-cuts which have been lightly sanded to remove sharp edges), PVA glue and string (or any other fibre.... I've used some wools in different textures and thicknesses as well as string).
First, PVA is generously applied to the face of the wood, fibre put down in a pattern, or as in the case of one of the wools, just stretched out (it featured netting strips, bobbles and wisps of wool) and everything left to dry.


Wood blocks showing string and wool designs ready for printing and below, some of the prints using the above blocks.


Then the fun of printing. I experimented with Distress Ink, but found this needed frequent application to get a repetitive print. In the end I went with Distress Stains and had some great results. The best came from the wool. These, with just a small application of stain gave fantastic paper coverage. I ended up with two, 12x12 backgrounds and one A4, from the one application..... a little really did go a long way. I've made 7 print blocks so far but will make more, varying the sizes so I can vary the fibres being used. ( It's also a great way to recycle bits of string and other fibrous packaging, and bits of ribbon and lace that may be too small to use elsewhere).

This post leaves me thinking of everyone effected by yet another weekend of natural disasters in Australia, with the east coast of Qld and NSW being hit by torrential rain, cyclonic winds and severe flooding. Where I am, is safe from flooding, but we have certainly been feeling the force of the wind, the worst I have experienced in my 30 years here. Wherever you are, take care and be safe.

Thank you for stopping by. I love knowing if you have visited. Cheers, Di

Sunday, 20 January 2013

Faery Fantasy

Hi and welcome. I normally do layouts for the ARTastic challenge, but this time I decided to do a reverse canvas, so I could add more depth in layers. I've also gone for a fantasy theme, with 'wings' as the main feature. Pop over to have a look at the site to see what the fabulous design team has been up to. http://artasticchallengeblog.blogspot.com.au
Gesso was applied to the background of the canvas and the frame around it. Once dry, the whole piece was stippled with acrylic paint to which I applied a retarder to help colours blend and to slow down the drying time. The whole piece was then sprinkled with salt to lift off some colour and leave an interesting finish. I didn't paint a recognisable landscape, just let the paint do the work. Using the paint retarder and salt held things up for a while... took a lot longer to dry than anticipated (even with quick bursts from the heat gun).

Canvas stipples with acrylic paint


To fit with the impression of foliage I stamped on flowers and leaves, fairies and butterflies.


Stamping done with Distress and Archival Inks. Wool lines are criss-crossing the canvas.

Below, a close-up shot showing stamps


For the wings, I used a heavy watercolour paper and watercolour paints using various techniques: wet-in-wet, dropping in colour, variegated wash, stippling and salt spatter. These colours were painted on as solid blocks, dried, cut around and folded in half with the reverse side showing


Wings in various shapes and styles were drawn. When cut out, additional features and shading was added using Lyra aquarelles, Lumieres, Acrylic Glitter Glaze and bling. One set of wings was formed from a bought chipboard flourish, coated with Opals enamelling powder (Currawong) and finished with crystals.


Now I would like to welcome you to Shaylee's Fashionable Faery Wings Shop. This exclusive little shop caters for very discerning fairies who want a unique, hand-crafted set of wings for a special occasion or outfit.


Shaylee, when I met her, was very friendly and very keen to show me her designer wings. She had these displayed on fine spider web filaments, held in place by some cooperative butterflies. (A couple must have flown off when I arrived).
If you find one of the elusive fairy glades, be sure to make yourself known and ask about Shaylee's shop. You may be lucky to find her, because she wanders from place to place, loving to travel and meeting other fairy folk and finding new ideas.
The sign on Shaylee's shop is written in Gaelic, which I hear, is a language familiar to all fairy folk. (I'm hoping that I have translated this correctly and I apologise to any Gaelic-speaking readers, if this is incorrect in any way... information came from various sites on the net)


A fibrous wool, material leaves and flowers and a velvet butterfly completed the piece.

Thank you for visiting.I love reading your comments and words of encouragement. Cheers, Di


Thursday, 17 January 2013

Butterflies

Hi! and welcome to my post. Today I'm showing my entry for ABAC Challenge 10 featuring wings
http://anythingbutacard.blogspot.com.au/

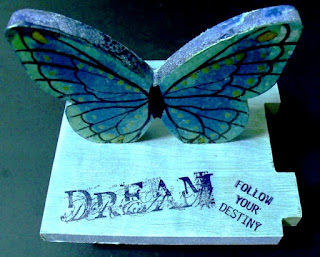
The piece started out as a Kaiser craft precut MDF bookend kit .

Basic Kit

The board was gessoed before transforming. The base and end boards were daubed with Distress Stains, which were then brushed across the surfaces before they dried.

Stained boards

The butterflies were heat enamelled. The black line work was originally done with black Glossy Accents, but I found that these peeled off quite easily! Luckily I'd only completed one side of a butterfly before I discovered this. Lines were then drawn on using a permanent marker. Gold markings were done with a metallic acrylic paint.


Stamping was added, using StazOn. Letters on the end board were from a bought glitter board alphabet set. These were daubed with metallic Distress Stains. The butterfly embellishment found languishing in my stash was silver originally, but I coloured it with alcohol inks.


The whole piece was then constructed and glued with PVA. So now I have a set of bookends, functional and pretty at the same time. I was going to add more embellishments, but considered the purpose and have decided that I could use the flat surfaces as a display area for small knick-knacks, if I chose to do so.         


Materials Used:
gesso,  Distress Stains: Peeled Paint, Bundled Sage, Brushed Pewter,  Burnished Brass, Weathered Wood, Broken China;  Opals Embossing Enamels: Banksia (soft gold), Macquarie (vibrant blue), Daintree (soft gold-green), Dove Lake (a deeper blue);  StazOn: Midnight Blue;  Alcohol Ink: Sailboat Blue;  Peel-off Markers;  Lumiere Paint: Sunset Gold;  Darkroom Door Stamps: Discover;  Stamping Up Stamps: Just Believe.

Now, time to reorganise some space so I can use my new craft additions. Thank you for visiting and thank you for leaving crafty comments.  Cheers, Di